To prototype a product means you’re building a tangible, testable version of an idea—anything from a paper sketch to a clickable model—to see if it holds water before you sink a fortune into building the real thing. For a Product Manager, its entire purpose is to de-risk your product by learning as much as you can, as fast and cheap as you can.
At companies like Google, Meta, and even fast-moving startups, prototyping isn't just a design step; it's the core mechanism for making evidence-based decisions. It's how you avoid becoming a statistic and instead, ship products people actually use and pay for. This playbook gives you the exact frameworks, tools, and processes I've used to do just that.
Your Blueprint to Avoid the 95% Product Failure Rate
Starting a new product is an incredible rush, but the numbers don't lie. Most new products simply fail. And it’s rarely because the idea was bad. It’s because the final product was completely disconnected from what users actually needed.
The statistics are brutal: a staggering 95% of new products fail, according to research involving the legendary Harvard Business School professor Clayton Christensen. Think about that. With nearly 30,000 new consumer products hitting the market each year, almost all of them are destined for the scrap heap.
The number one reason? Teams build something customers don’t want. This is exactly why learning to prototype isn't just a nice-to-have skill for PMs; it's a non-negotiable competency for career survival and advancement. A typical Senior PM job posting at a company like Adobe will list "experience with rapid prototyping and user testing" as a core requirement, directly impacting a salary that can range from $150k to over $220k.
Prototyping as a Strategic Imperative
I've launched products at scrappy startups and giants like Google, and I can tell you this: effective prototyping is your best defense against becoming another statistic. It isn't just a box to check in your project plan; it's a strategic mindset.
By building a tangible representation of your idea, you force everyone—yourself, your stakeholders, your engineers—to stop talking in hypotheticals and confront reality. It's not about being perfect. It’s about learning.
The goal of a prototype is not to build a finished product. The goal is to build a learning machine. Every test, every user interaction, every piece of feedback is data that refines your direction and prevents you from spending months building the wrong thing.
This mindset shift saves millions in development costs and prevents months of wasted engineering cycles. It’s what separates the PMs who consistently ship products people love from those who just ship products.
De-Risking Your Product Before You Build
At its core, prototyping is an exercise in de-risking. Every new product idea is built on a mountain of assumptions.
We assume:
- Users actually have the problem we think they have.
- Our solution is the right way to solve it.
- Our interface is intuitive and people will know what to do.
- The feature is valuable enough for people to bother using it.
Each one of these is a landmine that can blow up your product launch. Prototyping lets you test these assumptions with real users before you write a single line of production code. It shifts validation from the conference room to the real world.
The following table breaks down exactly how prototyping acts as your insurance policy against the most common product development risks.
The Prototyping Value Matrix
| Common Product Risk | How Prototyping Mitigates It | Example Consequence of Skipping |
|---|---|---|
| Building the Wrong Product | Validates user need and problem-solution fit with real feedback. | You spend 6 months and $500k on a feature no one uses. |
| Poor Usability (UX) | Uncovers confusing flows and friction points early in the design phase. | High user drop-off rates and support tickets overwhelm your team post-launch. |
| Technical Feasibility | Identifies complex engineering challenges before committing resources. | Engineers discover a "showstopper" late in the game, forcing costly redesigns. |
| Low Value Proposition | Tests if users perceive enough value to adopt or pay for the solution. | The product launches to crickets because it's a "nice-to-have," not a "must-have." |
| Misaligned Stakeholders | Creates a tangible artifact that gets everyone on the same page about the vision. | Sales, marketing, and engineering all have different ideas of what's being built. |
This process of gathering concrete evidence is how you learn the critical difference between a product's viability and its technical feasibility—a distinction every great PM has mastered.
Ultimately, by getting real-world feedback early and often, you stop building on belief and start building on evidence. That’s how you create products that don't just launch, but actually succeed.
Choosing Your Fidelity Level and Prototyping Tools
The word "prototype" gets thrown around a lot, covering everything from a coffee-stained napkin sketch to a fully interactive, coded model. As a Product Manager, your real job isn't to master every tool out there. It's to pick the right approach for the right moment.
Getting this choice right is the difference between learning something crucial in an afternoon and wasting weeks on a beautiful, pixel-perfect design that's fundamentally flawed.
The level of detail in your prototype is called its fidelity. This isn't a scale of "good" to "bad." It's a strategic choice you make based on a single question: What am I trying to learn right now? Validating a core user flow is a completely different game than getting a final sign-off from a VP.
Matching Fidelity to Your Goal
Your decision really boils down to three levels of fidelity. Each has a specific job to do in the product lifecycle.
Low-Fidelity (Lo-Fi): This is all about speed and gut-checking your core concept. Think paper sketches or the most basic digital wireframes. The goal here is to test the pure logic and flow of your idea, nothing more. You get brutally honest feedback at this stage because no one is distracted by pretty colors or fonts—they're just focused on whether the idea itself makes any sense.
Mid-Fidelity (Mi-Fi): Now we're adding some structure and clickability. Tools like Balsamiq are perfect for this. You're creating clickable wireframes that start to feel like a real product but are still very obviously a work-in-progress. Mi-Fi is my go-to for nailing down information architecture and complex navigation paths.
High-Fidelity (Hi-Fi): At this point, the prototype should look and feel almost exactly like the final product. Using a tool like Figma, you're building pixel-perfect, interactive mockups. Hi-Fi is non-negotiable for securing stakeholder buy-in, running late-stage usability tests, and handing off crystal-clear specs to engineering. At a company like Meta, a Hi-Fi prototype is pretty much required before a major feature gets funded.
A classic mistake I see junior PMs make is jumping straight to a high-fidelity prototype. They burn a week polishing a gorgeous design, only to find out in the very first user test that the core concept is broken. Always, always start with the lowest fidelity you can get away with to validate your riskiest assumptions first.
A Decision Tree for Choosing Your Prototype Fidelity
Don't just default to your favorite tool every time. Use a simple framework like this to make a strategic choice you can defend.
Fidelity Decision Tree
| Your Primary Goal | Your Timeline | Ideal Fidelity Level | Example Scenario |
|---|---|---|---|
| Validate a core concept or user flow | 1-2 Days | Low-Fidelity | You have a new idea for a SaaS feature and want to see if the steps make sense before any design work starts. |
| Test navigation and information layout | 3-5 Days | Mid-Fidelity | The user flow is solid. Now you need to see if people can easily find key functions in a grayscale, clickable wireframe. |
| Secure stakeholder buy-in or test visual design | 1-2 Weeks | High-Fidelity | You're pitching a new app to leadership and need to show them exactly how it will look and feel to get budget approval. |
| Build a functional MVP without code | 1-3 Weeks | Functional Prototype | You need to test real-world data handling for a new marketplace idea, demonstrating end-to-end functionality to users. |
This isn't just for you; it's a communication tool. Instead of saying, "I'm making a wireframe," you can now say, "I'm building a low-fidelity prototype to validate our core user flow in the next 48 hours. This will de-risk our biggest assumption before we invest a single dollar in design."
The Modern PM's Prototyping Toolkit
Your toolkit needs to be as flexible as your strategy. For any PM today, being proficient in a few of these tools is a major career advantage.
Recommended Tools by Fidelity Level:
Low-Fidelity:
- Paper & Pen: Still unbeatable for raw speed. Perfect for a quick brainstorming session.
- Balsamiq: The king of rapid, low-fi wireframing. Its intentionally "sketchy" look is a feature, not a bug—it perfectly manages everyone's expectations. A monthly subscription is about $9.
High-Fidelity:
- Figma: This is the industry standard, period. Its real-time collaboration, powerful component libraries, and robust prototyping features make it indispensable. PMs are increasingly expected to be comfortable navigating and commenting in Figma. A professional plan is around $12/editor/month.
- Axure RP: A true power tool for complex interactions and conditional logic. It's often the choice for enterprise applications where you need to simulate data-heavy workflows.
AI-Powered & Functional:
- Uizard.io: An AI-powered tool that can turn hand-drawn sketches into mockups and generate UI from text prompts. It's excellent for accelerating from Lo-Fi to Mi-Fi.
- Galileo AI: Generates editable UI designs in Figma from a single text prompt, leveraging trained models to create high-quality, production-ready interfaces instantly.
- Bubble: Lets you build fully functional web apps with databases and user logic, all without writing a line of code. It's the ultimate tool for creating a functional prototype that feels completely real to users.
And for those of you wanting to get ahead of the curve, it’s worth exploring some of the modern AI prototyping tools that are starting to emerge. They can help you get from idea to interactive concept even faster.
The key is to remember the goal: choose the tool that helps you learn the most, the fastest, for your current stage.
The Rapid Prototyping Workflow: From Idea to Testable Prototype in 48 Hours
In product management, speed is everything. What separates the best teams from the rest is the ability to get from a fuzzy idea to something a real user can test in a matter of days, not weeks.
This isn't about moving fast and breaking things. It's about having a focused, repeatable process for learning as quickly as you can. I've personally used this workflow to lead teams at startups where every single hour mattered. The goal is to build a learning instrument, not a perfect product.
Day 1, Morning: Define the Core Problem and Critical Path
Before you even think about opening a design tool, you need to get crystal clear on two things: the one problem you're trying to solve, and the single most important path a user will take to solve it. This is your critical path.
It's the bare-minimum sequence of actions a user has to take to get any value from your idea. At this stage, everything else is just noise.
For example, let's say you're building a new expense reporting feature. The critical path isn't a user's profile setup or fancy CSV exports. It’s this:
- The user opens the app.
- They take a picture of a receipt.
- They enter the amount and category.
- They hit "submit."
- They see a confirmation that it worked.
That's it. Nailing this focus is the first real step to building a prototype that can answer a specific, high-stakes question. Anything outside that flow can—and should—wait.
Day 1, Afternoon: Accelerate Your Flow with AI
As a modern PM, you’d be crazy not to use AI to get a head start. I’ve found generative AI is brilliant for brainstorming structured user flows, giving you a solid first draft in seconds. This frees you up to spend your energy refining and validating, not staring at a blank canvas.
Pro-Tip AI Prompt: Head over to ChatGPT, Claude, or your LLM of choice and give it a role. For instance: "Act as a Senior PM for an AI-powered analytics tool. Your goal is to de-risk a new feature concept within 48 hours. Generate a 5-step user flow for a new feature that lets users create a custom dashboard using natural language queries. Focus only on the critical path from query to dashboard creation. Omit all secondary features like sharing, exporting, or settings."
A prompt like this gives you an instant, structured jumping-off point. You'll still need to edit and challenge it, but you've just skipped hours of initial ideation. The trick is to be specific and frame the AI as an expert collaborator.
Day 1, Evening: Sketch the Minimum Viable Screens
With a tight critical path defined, you can start to visualize the screens. I always recommend starting with super low-fidelity sketches on a whiteboard or just a piece of paper. This isn't about being an artist; it's about translating your flow into a visual sequence.
Only sketch the screens absolutely essential for your critical path.
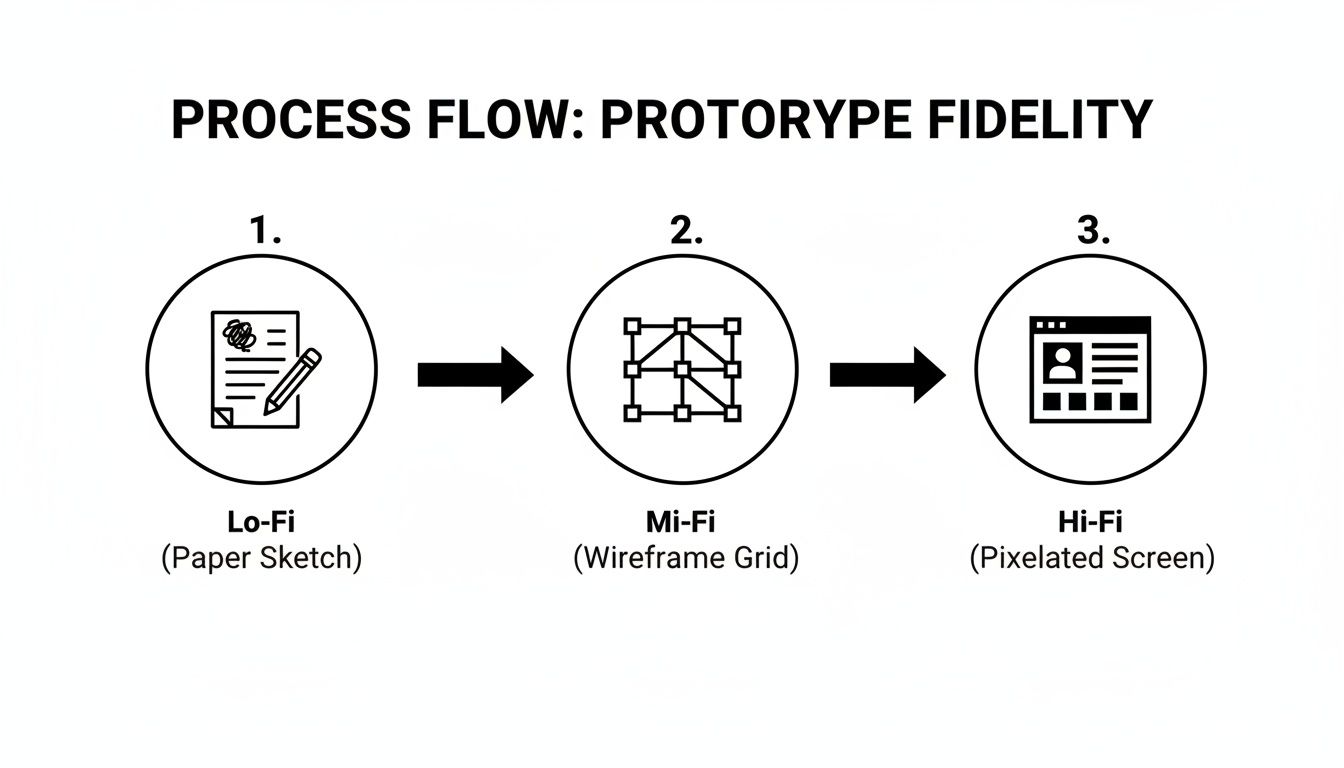
This progression from Lo-Fi scribbles to Hi-Fi polish is crucial. It makes sure you're putting the right amount of effort in at the right time, validating the core idea before you ever get bogged down in pixel-perfect designs.
For a deeper dive into this testing phase, you can learn more about how to prototype and test effectively to ensure you're gathering meaningful feedback. As you move through your development process, a detailed guide to crafting your crowdfunding prototype can also provide a valuable roadmap.
Day 2, Morning: Build and Connect in Figma
Once your paper sketches feel right, it’s time to jump into a tool like Figma. Again, the goal here is not to create a beautiful, award-winning design. You're just building enough to make the flow testable. Think simple, grayscale boxes and placeholder text.
From there, you just use Figma's prototyping mode to connect the dots—linking a button on one screen to the next screen in your flow. In minutes, this turns your static wireframes into a clickable, interactive prototype that actually feels like a real product.
You've now created just enough interactivity for a user to complete the critical path you defined from the start. And with that, you have a powerful artifact ready for immediate validation testing with real people.
Running Validation Tests That Deliver Actionable Insights
A prototype sitting in a Figma file has zero value. Its only purpose is to be a learning machine, and that requires putting it in front of real users. This is where you separate a good idea from a good product—it’s where your assumptions either become evidence or get thrown out.
Running effective validation tests isn’t about asking people if they "like" your design. It's about observing their behavior to find the gap between what they say they’ll do and what they actually do.
Finding the Right Users Cheaply
The first hurdle is always recruiting. Your goal isn't to find just anyone; you need people who are a dead ringer for your target persona. If you’re building an enterprise analytics tool, feedback from your cousin who lives on TikTok is completely worthless.
Here are my go-to methods for finding high-quality testers without a massive research budget:
- Your Network (Level 1): Post on LinkedIn or X with a crystal-clear call: "Seeking data analysts at mid-size tech companies for a 30-minute feedback session on a new product concept. Will offer a $50 gift card for your time." Be specific about who you need.
- Your Network (Level 2): Ask your initial contacts, "Who are two other people you know who fit this description?" This referral method almost always brings in high-quality participants.
- Niche Online Communities: Go where your users hang out. This could be a specific subreddit (like r/dataanalysis), a professional Slack community, or a specialized forum. Just make sure to get permission from the moderators before you post.
- User Interview Platforms: Services like UserInterviews.com and Respondent.io are pricier but incredibly efficient. You can screen for precise demographic and professional criteria, which saves hours of outreach. For a B2B product, this is often worth every penny.
Aim for five users per testing round. Research has shown for years that testing with just five people will reveal about 85% of the usability problems in your design. After that, you just start hearing the same things over and over again, and the returns diminish fast.
Scripting Tests to Uncover the Truth
During a usability test, your job is to be a neutral observer, not a salesperson. The moment you start defending design choices or leading the user, you’ve contaminated the test. Your script should be built around open-ended tasks, not questions.
Instead of asking, "Is this button clear?" you say, "Show me how you would accomplish [user goal]."
Here is a simple, effective script template I’ve used for years. It’s designed to uncover the user’s mental model and pinpoint friction.
My 5-Question Usability Script Template:
- The Context-Setter: "Before we start, tell me a little bit about how you currently handle [the problem your product solves]." (This warms them up and gives you vital context).
- The Homepage Test: "Take a look at this screen for a few seconds. What do you think this is for? Who is it for? What can you do here?" (This is a raw test of your value prop and clarity).
- The Core Task: "Imagine you need to [achieve the main goal of your critical path]. Show me how you would do that, and please think out loud as you go." (This is the money shot. You watch their clicks, their hesitations, and listen to their thought process).
- The Follow-Up Probe: "You seemed to hesitate for a moment on that last screen. What were you thinking there?" (Use this to dig deeper into specific behaviors you observe).
- The Magic Wand: "If you had a magic wand and could change anything about what you just saw, what would it be and why?" (This often reveals their biggest unmet need or frustration).
For PMs just getting started, learning more about the intricacies of testing the prototype can be a game-changer for extracting meaningful feedback.
Separating Signal from Noise
After five sessions, you’ll be drowning in notes. Your next job is to find the patterns—the signal—and ignore the one-off comments—the noise.
A single user hating the color blue is noise. Four out of five users struggling to find the 'submit' button is a powerful signal that your design is broken.
Create a simple spreadsheet. For each user, list the key usability issues they ran into. Then, look for the problems that came up three or more times. Those are your high-priority signals.
This analysis gives you a clear, prioritized list of what’s working, what’s broken, and what needs another go. It transforms a mess of qualitative opinions into a data-backed tool for making your next decision. This is how you methodically build a product that wins.
The Handoff From Prototype to Production
You’ve done the hard work. You’ve sketched, built, tested, and iterated. Your prototype is validated by real users, and the data shows you're onto something people actually want. Now for what I consider the most dangerous part of the entire process: the handoff to engineering.
All your hard-won progress can be wiped out by a single sloppy, ambiguous handoff. I’ve seen it happen more times than I can count. A brilliant, validated concept devolves into a frustrating, delayed mess because the why behind the design was lost in translation. This is where a PM truly earns their keep—by creating an unbreakable bridge of clarity between the design vision and the code.
This isn’t just a final box to check; it’s a critical risk-mitigation phase. A shocking 43% of new product failures globally are tied back to mistakes made during prototyping. These mistakes lead to average cost overruns of 40% and delays of over 8 weeks. A single error at this stage can push your time-to-market back by months. A flawless handoff is non-negotiable.
Creating an Airtight Handoff Package
Your goal is to eliminate all guesswork for the engineering team. They should never have to ask, "What happens if a user clicks this?" Your handoff package must be a self-contained, single source of truth.
As a leader, I judge a PM’s handoff with one simple test: could a new engineer, completely fresh to the project, understand exactly what to build and why, just by looking at the artifacts? If the answer is no, it's not ready.
To make your handoff rock-solid, you need to pull together a few key documents that work together as a system.
Your Prototype Handoff Checklist
This isn't just a to-do list; it's a system for ensuring nothing gets lost in the shuffle. Before you even think about scheduling that kickoff meeting, make sure you have every one of these artifacts ready and linked together.
A Fully Annotated Figma File: Don’t just hand over a clean design. Your Figma file should be a living document, plastered with annotations. Specify states (hover, clicked, disabled), write out error messages, and define empty states and edge cases. Make sure to link directly to specific frames from your Jira tickets.
Crystal-Clear User Stories in Jira: Each story needs razor-sharp acceptance criteria and must link back to the relevant prototype screens. A bad story is "User can log in." A good story is "Given a user is on the login page, when they enter valid credentials and click 'Sign In,' then they are redirected to their dashboard." Be specific.
A Usability Insights Summary: This is arguably the most important document of the bunch. It’s a concise summary (one page, tops) of what you actually learned during user testing. Highlight the top 3-5 insights and, crucially, explain why certain design decisions were made. For example: "We moved the 'Export' button to the top right because 4 out of 5 users couldn't find it in the side menu during testing." This context prevents engineers from re-litigating validated decisions.
A Loom or Video Walkthrough: Record a 5-10 minute video of you clicking through the prototype, explaining the critical user path and key interactions out loud. This is pure gold for async communication and for new folks who join the team later. It becomes a permanent reference point that saves everyone time.
This entire process is a critical journey. For a comprehensive look at navigating this transition, you can explore a proven roadmap from prototype to product.
The Crucial Kickoff Meeting
Once your artifacts are prepped and shared, the kickoff meeting ties it all together. This meeting absolutely must include you (the PM), the lead designer, and the tech lead. I call this the "trinity"—it ensures product, design, and engineering perspectives are aligned from day one.
Walk through the prototype together, screen by screen. The goal here is to actively invite questions and challenges. Your tech lead might spot a technical constraint you and the designer missed. The designer can clarify the nuance of an interaction. Your job is to facilitate, answer the 'why' questions, and make sure everyone leaves that room with the exact same picture of what needs to be built.
By following this structured approach, you empower your engineering team to do what they do best: build great software. You kill ambiguity, slash rework, and set your product up for a successful launch. If you want to dive deeper, you can find more guidance on moving from a prototype to a final product here.
Common Prototyping Questions for Product Managers
Even with the best playbook, you’re going to hit some tricky situations when you start prototyping. I've hired and mentored PMs for years, and I see the same practical questions pop up over and over again.
These are the nuances that separate the theory you read online from what actually works when you have to get a product built.
Here are my no-nonsense answers to the common hurdles that product managers—from aspiring PMs to VPs—run into all the time.
How Do I Know What Fidelity Level Is Right?
Forget your favorite tool for a second. The right fidelity is all about your most pressing question. What's the one thing you absolutely need to answer right now? Your fidelity choice should match the uncertainty you're trying to kill.
- Goal: Early Idea & Flow Validation? Go Low-Fidelity. Think paper sketches or the most basic wireframes. They’re fast, cheap, and force people to give feedback on the core logic, not get hung up on the button color.
- Goal: Test Navigation & Information Architecture? Use Mid-Fidelity. This is where clickable wireframes in a tool like Balsamiq really shine. You can test if users can actually find what they need, long before a designer has polished the UI.
- Goal: Secure Stakeholder Buy-in or Test Visuals? Go High-Fidelity. When the concept is solid and you need to align everyone on the final look and feel, a realistic, interactive mockup from Figma is non-negotiable.
The rule of thumb is simple: Your prototype's fidelity should be proportional to the confidence you have in the problem you're solving. Start low to confirm the 'what,' then go high to nail down the 'how.'
My Stakeholders Want a High-Fidelity Prototype Immediately
This happens to every PM. It’s one of the classics. Your stakeholders are pumped and they want to see something that looks and feels “real.” Your job isn’t to just push back; it's to reframe the conversation around speed and learning, not just pretty pictures.
Explain that starting Lo-Fi isn’t about cutting corners. It's a strategic move to de-risk the project. It lets the team validate the most critical user assumptions in a matter of days, not weeks, which saves a ton of time and money down the line.
I've had a lot of success with this line: "I'm just as excited to get to a beautiful final design. To get there faster, let's use quick wireframes this week to confirm we're actually solving the right problem for users. Once we have that validation, we'll build out a high-fidelity version to get everyone aligned on the final look and feel."
This positions you as a strategic partner who’s driving the project efficiently, not just an order-taker executing on a request.
How Do I Prototype for AI-Powered Features?
Prototyping an AI feature can feel impossible. You obviously can’t spin up a custom large language model (LLM) for a quick test. The secret here is a classic technique called the "Wizard of Oz" method.
Basically, you fake it. You simulate the AI's response manually behind the curtain. The user thinks they're interacting with a super-intelligent system, but it's really a human (you or someone on your team) pulling the levers.
Example Scenario: Prototyping an AI Copilot for Data Analysis
- The Problem: You want to build a feature where a business analyst can ask a natural language question (e.g., "What were our top 3 performing marketing channels last quarter?") and get an instant chart.
- The "Wizard of Oz" Prototype:
- UI: Build a dead-simple interface in Figma: just a text input box and a "Generate Chart" button.
- The Test: During a user interview, give the user the task: "Ask the system for last quarter's top marketing channels."
- The "Wizard": As soon as they hit "Generate," you (the "wizard") don't run any code. You simply navigate them from the input screen to a pre-made screen in Figma that displays a perfect bar chart answering their exact question.
- The Learning: You've just tested the entire user experience—Is the query valuable? Is the chart format helpful? Is the flow intuitive?—without writing a single line of backend AI code. This method keeps the focus squarely on the user's interaction and the perceived value of the outcome, which is where a PM's attention should be.
This is the fastest way to figure out if your AI concept is a game-changer or just a gimmick, and it's a technique used constantly at companies like OpenAI and Google to test new AI product ideas.
Ready to advance your PM career with insights from a leader who's been in the trenches at companies like Google and top startups? Join the Aakash Gupta newsletter and podcast for actionable advice on product growth, management strategy, and career acceleration. Become part of one of the world's largest communities for product leaders at https://www.aakashg.com.
